Embroidery for a Bag (1)

Large felt bags are popular at the moment. You can buy them in many colours and different sizes.
I find a bag like this very practical for transporting my utensils when I want to take part in the embroidery circle.

To my regret, the bags have a label that I don’t find very nice.

So I thought about how the bag could be redesigned according to use. I came up with the idea of ​​embroidery covering the lettering.

I choose hand-woven linen because I like the structure and colour of it well with my anthracite-coloured felt bag.

My bag is 45 cm wide and 30 cm high. The handles start at a height of 23 cm. The remaining space for embroidery is 45 cm x 23 cm, approximately half as high as it is wide. I don’t want to fill the entire space, but I want the embroidery to match the bag size and cover all of the printed characters.

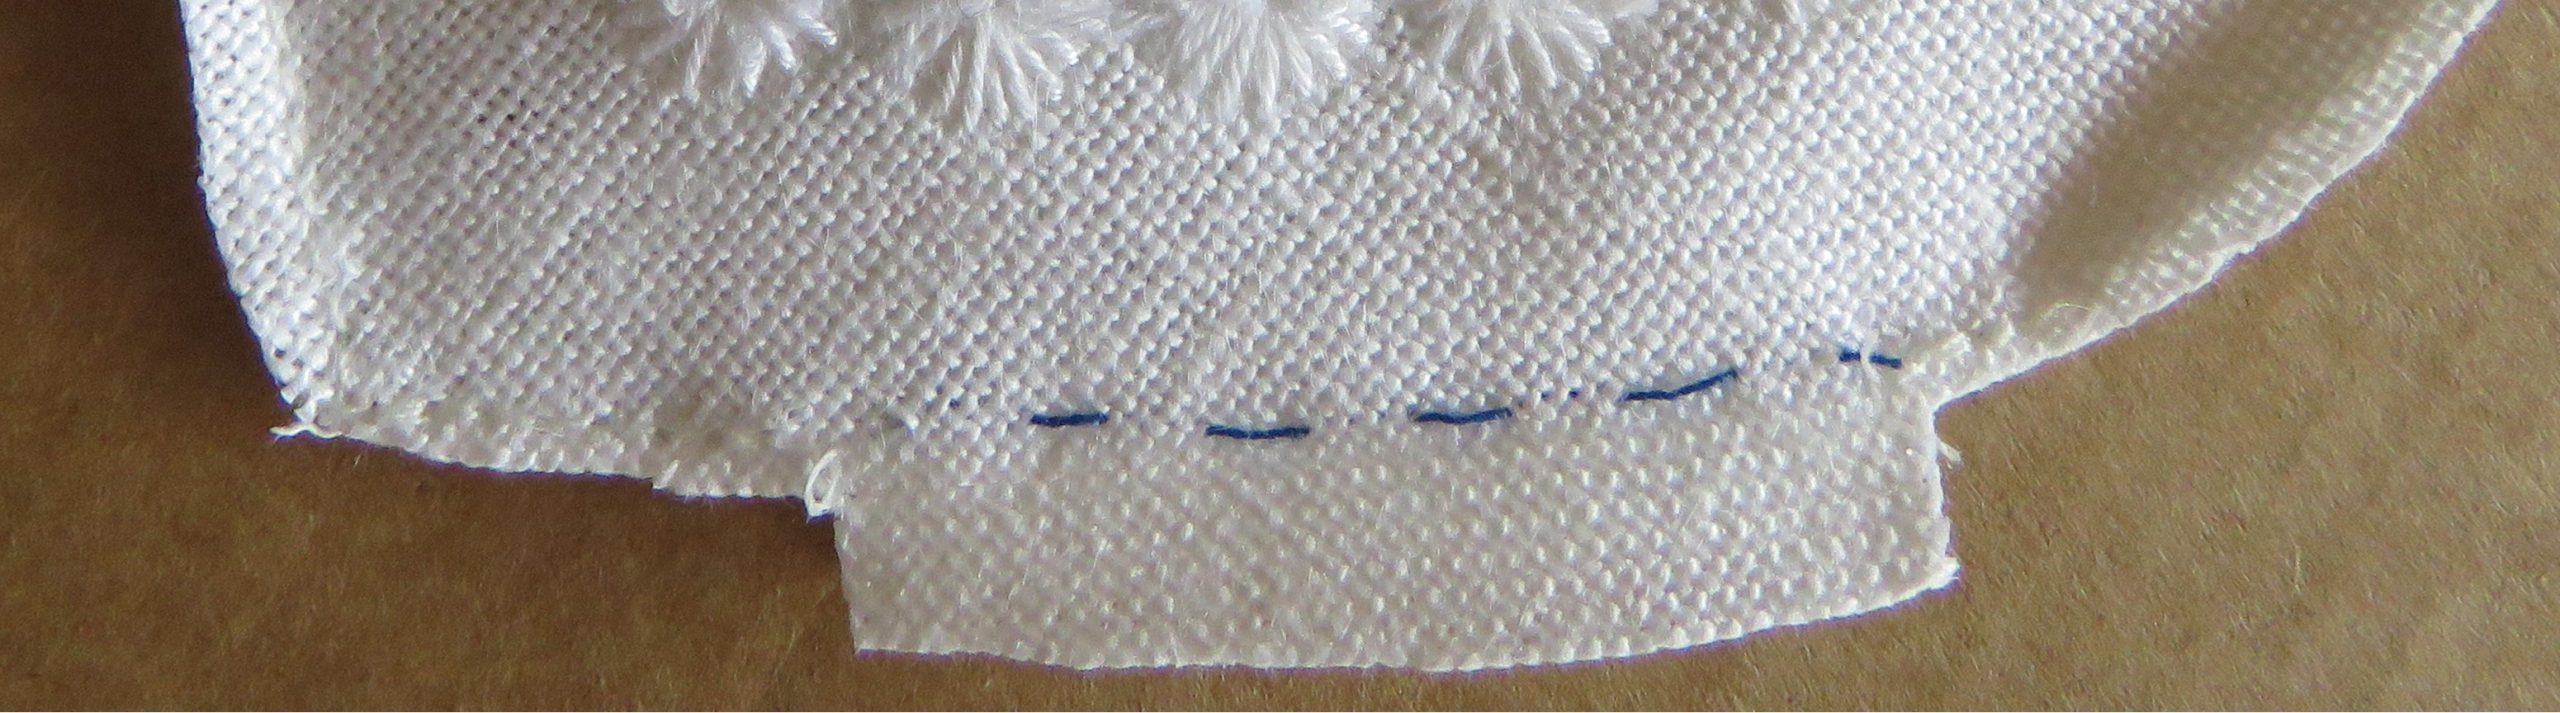
Therefore, I choose a finished size of 38 cm x 19 cm and add a seam allowance of 1 cm on each side. So I cut the linen to size 40 cm x 21 cm. A pattern that fits this format can be printed quickly.

The embroidery can begin.
(Since I would like to use this project as photo material for a short presentation of Schwalm whitework, I don’t proceed as usual, but only work in partial areas. This way one can follow the necessary steps in a single photo.)

But that shouldn’t bother you and you should of course proceed as established.

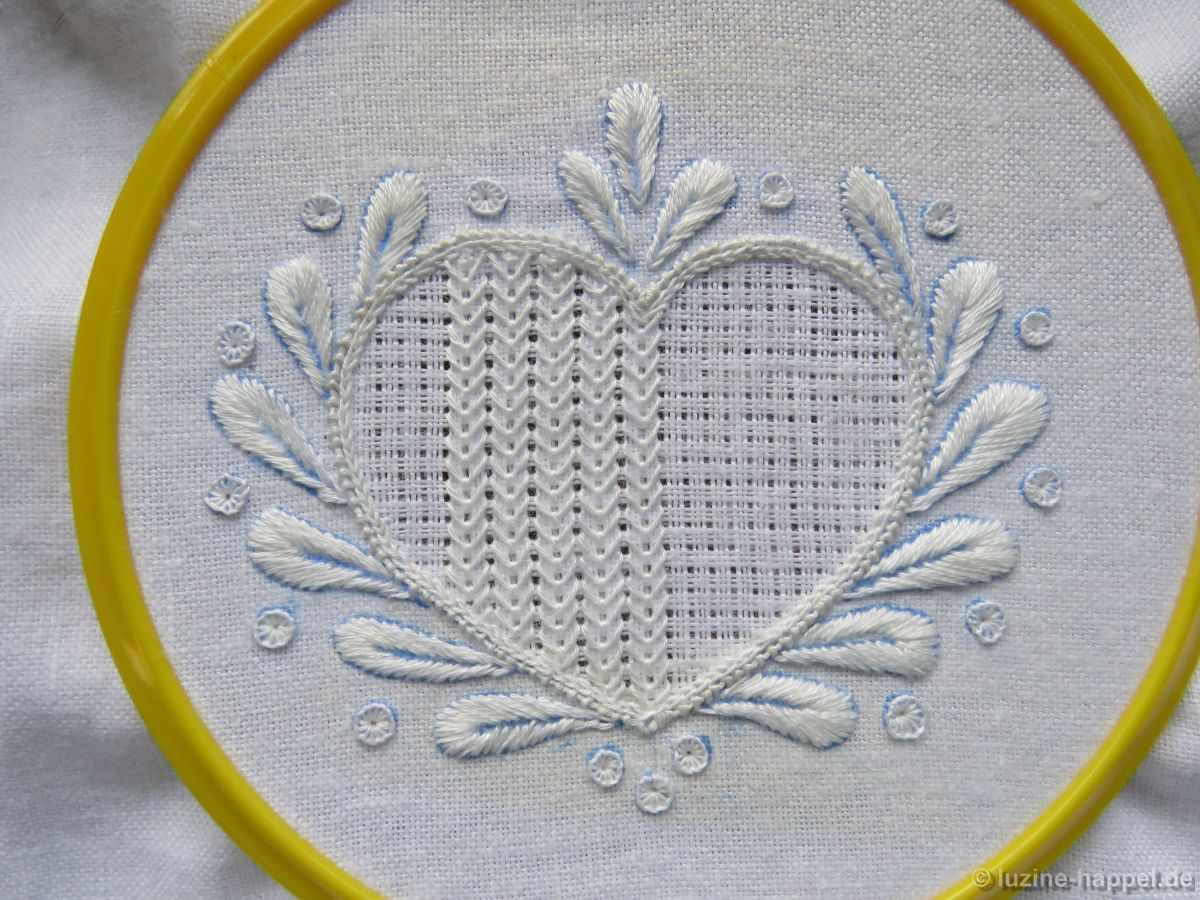
The heart receives an openwork thread withdrawing 2:2. The grid is secured from the back with Cable stitches. Filling pattern 442 is worked using needle-weaving stitches.

The tulip receives a Limet thread withdrawing 3:1 and a Röserich filling pattern (The Most Beautiful Röserich Filling Patterns)

The small circle gets a Limet thread withdrawing of 4:1 in width and 3:1 in height in order to be able to set the pattern evenly despite the uneven fabric. A cross made of Satin stitch bars is placed in the center. The remaining areas are each decorated with a Rose stitch

The bird’s belly is given a simple 3:1 withdrawn thread pattern with Honeycomb Darning stitches.
The bird’s wing has a relatively small area. Therefore, thread withdrawing is made 2:1 and the grid is secured from the back with Cable stitches.

The large leaf gets a 3:1 Limet thread withdrawing and Diagonal Cross stitches as a pattern.

The year of embroidering should be hidden in the small tulip. Therefore the thread withdrawing is made 2:1. The thread grid is secured with very thin thread with Cable stitches from the front (Single Faggot stitches on the back). The first part of the year is embroidered with Rose stitches (the second part goes into the tulip on the opposite side).

The second small circle remains. Since I want to show all the techniques used in Schwalm whitework on this sample, I fill the area with needlelace.

ou will find out what happens after the embroidery is finished in the next blog post.

Heart Cushion

To make a small heart-shaped pillow, you need two pieces of linen fabric. They should be large enough so that they can be easily placed in an embroidery hoop. The attached heart motif istransferred via iron-on or via direct tracing, using a water or a heat soluble pen, to one of the two parts.

The outer heart line is marked using coloured thread with short Running stitches. The heart with half-eyelet scallops is embroidered.

The finished embroidery and the other piece of linen – with the addition of a little washing powder –

are first soaked in water and then boiled.

Both parts are dried and well ironed and placed on top of each other so that the back of the embroidery is placed on the outside. Both parts are now sewn together closely along the marking line. Only in one place – as straight as possible – does a piece of approx. 4 to 5 cm remain open. The marking remains there, otherwise it is removed.

The edges of the fabric are unfolded and

the seam is smoothed with the thumbnail very well.

The excess fabric is ctrimmed close to the seam, but be careful – at least two fabric thread cross hairs must remain outside the seam so that the fabric does not fray later. Only in the unclosed area is a remaining fabric of approx. 1 cm.

The embroidery is carefully turned inside out. The seams are positioned on the outer edge by carefully pushing back and forth between the fingertips. Small, loosened portions of Poly-Fil or wadding are inserted through the opening into the heart bag and first transported to the edges with the fingers. The entire area is gradually padded up.

After enough filling has been added, the remaining fabric excess is folded inwards at the level of the marking. The marking thread is removed and the seam is closed with small, delicate hand stitches.

A cord is twisted using cotton yarn that is not too thin. If there is a Twister, this is child’s play. But you can also do it the old way with a pen or wooden stick.

Starting at the top center, attach the cord over the seam. The beginning and end are sewn together tightly close to the fabric.

The remaining ends are knotted together to form a hanging loop.

Together with a square cushion, the cones, small angels, bells, the cut out hearts, the snowballs and maybe also the mushrooms, the grapes and leaves or even small bags (here you can find the instructions), bag or hanging it can become a pretty and very individual Christmas tree decoration.

The Embroiderer Fritz Bierwirth

Men can also embroider excellently – that wasn’t new to me. Now this knowledge was reinforced by a visit from Fritz Bierwirth. He embroiders for up to 5 hours every day. And that at its best. He had some of his works with him. I was allowed to photograph these to share with you now.
But first things first: Born in 1940, he discovered his passion for handicrafts as a child. He spent much of his free time knitting and crocheting. He drove buses through many European countries for eight years before driving trams in Kassel until 1998.
After work he regularly picked up an embroidery needle. At first he was ashamed of his passion and made all handicraft utensils disappear as soon as a visitor announced himself.

He came to the Hardanger technique through tapestry embroidery.

But ever since he visited an exhibition of Schwalm whitework in the museum in Ziegenhain about 30 years ago, he became interested in this technique, which he taught himself.

From the first moment he was fascinated by Schwalm whitework, his enthusiasm has not left him to this day.

He often embroiders in white,

sometimes he uses subtle colors.

He had to stop embroidering for a few years. His eyesight was failing and caring for his wife, who had dementia, demanded his full attention. After her death and a successful eye operation, he likes to pick up the embroidery needle again. His hobby keeps him busy for several hours a day. He never gets bored.

In addition to the traditional outlines, he also likes to work openwork pattern borders into which he embroiders the motifs with needle-weaving stitches.

Back in 2002, he elaborately embroidered a baptismal dress made of the finest linen. This is shown in the 2004 exhibition catalog.
He can now look back on a large number of mostly elaborate embroideries.

At his daughter’s request, he also makes unusual pieces such as the large rabbit (pictured at the top) or the table runner adapted to the asymmetrical table.

He is currently working on a doily that he is embroidering in shades of green to match the furnishings. After many sizes of coton à broder threads were no longer available in his local store, he discovered straded cotton as a thread for Schwalm whitework. With the six individual strands of the twist, he can put together any thickness he wants. He likes to use 1-strand for the Cable stitches in openwork grids. This keeps the holes in the grid larger and the patterns stand out better. He twists several individual strands together before embroidering. This way everyone maintains the same tension and no loops form.

Schwalm Heart (1)

Many years ago, during an exhibition, I was able to purchase a few leftover pieces of linen along with the corresponding outline patterns for little money.
I have now acquired the rights to these patterns.
The pretty individual motifs are quickly embroidered. They are also ideal for processing leftover fabric.
Little things like pictures, bags or pillows were created in a short time. They are therefore suitable as souvenirs and perhaps also for sale as souvenirs for exhibitions.

I ironed such a motif onto 16 tpcm linen. In order to clearly transfer the iron pattern colour to the fabric, I ironed very hot. The slight scorching marks that were created can be clearly seen. They will disappear later in the wash.

The Coral Knot stitches were embroidered with coton á broder No. 16, Blanket stitch eyelets and Chain stitches withcoton á broder No. 30. The rounded leaves were decorated with Satin stitches. Here 2 strands of the 6-ply stranded cotton were used.

The Limet grid – thread withdrawing 3:1 – has a withdrawn theard line in the middle longitudinal axis.

Starting there, a pattern similar to the filling pattern 578, but without the rows of Four-Sided stitches in between, is embroidered with coton à broder No. 20 .

After the embroidery is finished, the piece is soaked in soapy water for a few hours and then boiled. The colour has completely dissolved after two repetitions of the short cooking process.

The scorching marks have also completely disappeared.

I like the relatively unobtrusive pattern in contrast to the striking edge with the many leaves

and Blanket stitch eyelets.

Depending on which angle you look at it from, the pattern looks different.

If you also want to embroider this small motif, you can download the hand-drawn outline pattern for free.

Filling Pattern – No. 579

category: Limet-Filling pattern
linen used: 13.5/cm thread count
threads used: coton à broder No. 20
stitches used: Back-, Straight- and Satin stitches
center: center: intersection of withdrawn thread lines (in other shapes or motifs: longitudinal axis = withdrawn thread line)
one pattern segment = 8 threads

The filling pattern shown here is a practice exercise only. You can see it used in a shape in the end of this article.

First, establish a Limet grid with a withdrawn thread line as the longitudinal axis by alternately cutting 1, leaving 3, vertically and horizontally.

Turn the motif 90° counterclockwise and embroider Backstitches over 3 fabric threads each along the central longitudinal axis.

At the end of the row, after completing the last Backstitch, bring needle up one square diagonally to the top left.

Cross under the working thread of the first Backstitch,

insert the needle 2 squares below the emerging point and move the needle up two squares and one square to the right and bring it up there.

*Cross under the working thread of the next free Backstitch,

insert the needle 2 squares below the emerging point and move the needle up two squares and one square to the right and bring it up there.*

Repeat these three steps (*) until the row is finished.
*Then leave a space of one square between a finished row and the next row of Backstitches

and work the row there with Backstitches and the row back with Straightstitches in the established way.*

Repeat these both steps (*),

until the entire area is filled.

When turned back to the original position, the pattern looks like this:

This pattern can be used as both a horizontal and vertical stripe pattern. It also looks interesting if you place it on the motif from top to bottom.