Horizontal Bird Border (3)

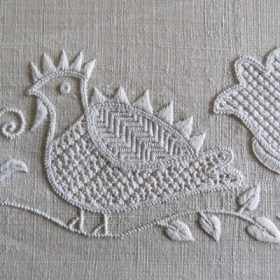
After pictures of the finished embroidery of the Horizontal Bird Border were shown in a first post and details of some motifs were shown in the following post, this post deals with details of the remaining elements.

The tulip, which lies slanting to the left, has a limet grid in the middle (thread withdrawing 3:1) and Diagonal Cross Filling stitches as a filling pattern (coton à broder No. 20).

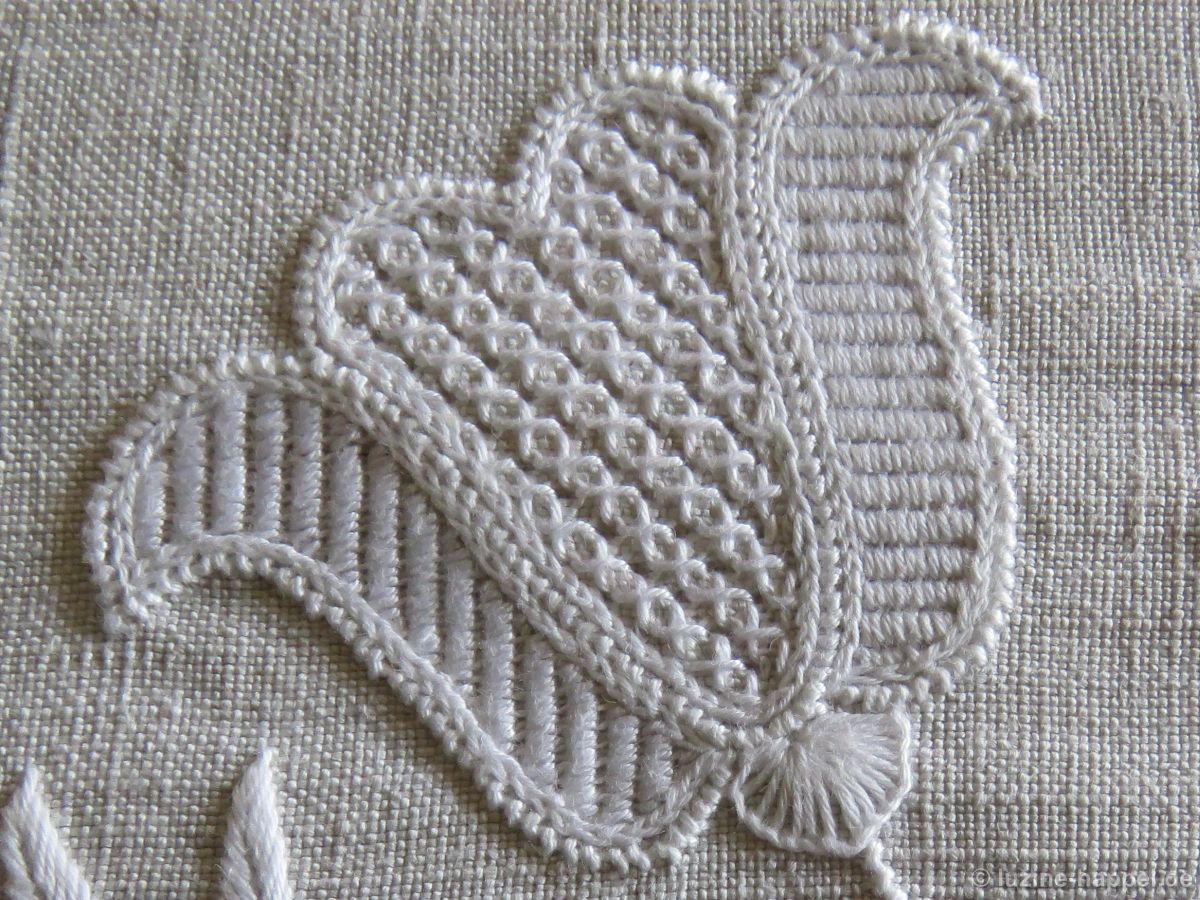
The tulip, lying slanting to the right, has an openwork grid in the middle section (thread withdrawing 2:2) and “Diagonal Cross Filling – French variation/”half” as a filling pattern (coton à broder No. 20) – Openwork Pattern Samplers, pages 32, 33)

The sides of both tulips are designed the same. Satin stitch bars (coton à broder No. 20) are worked as a simple withdrawn thread pattern (thread withdrawing 3:1 once vertically and once horizontally).

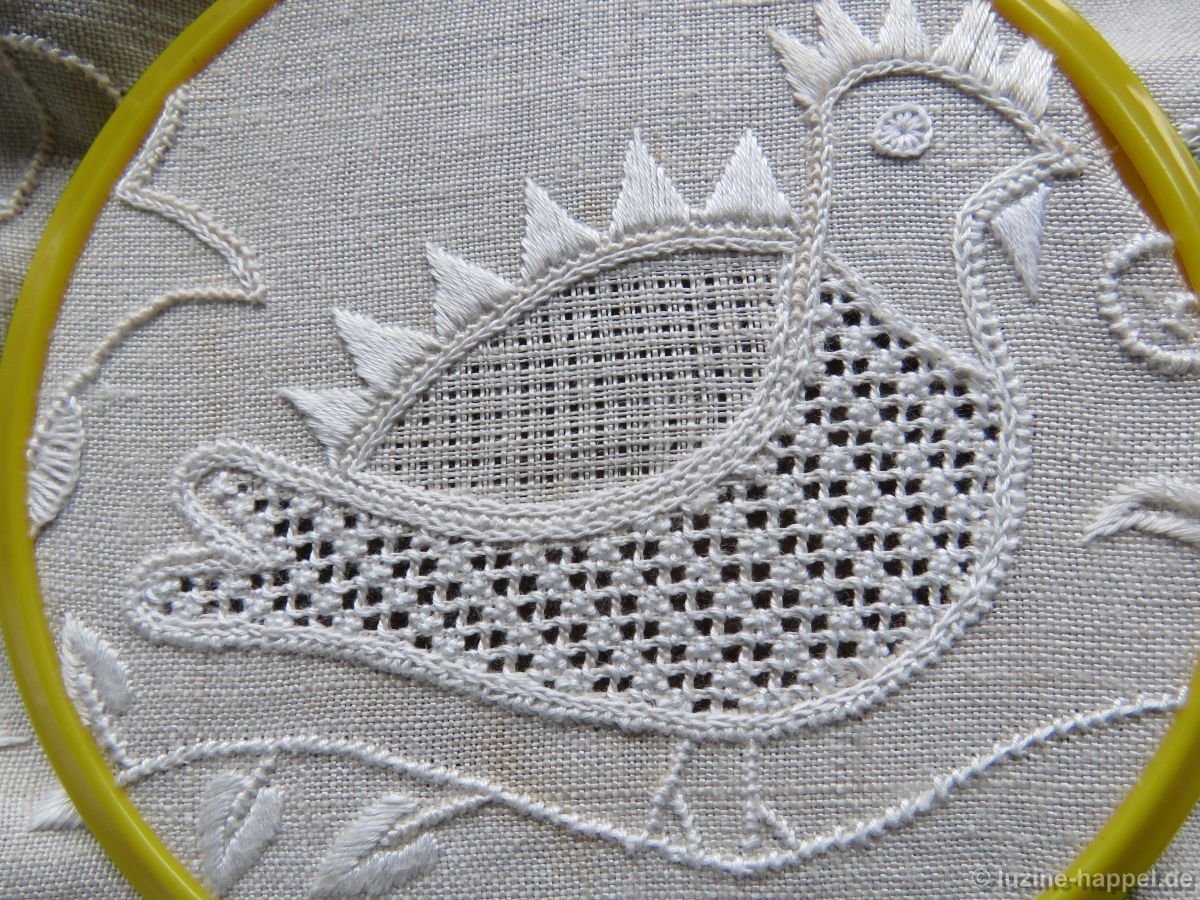
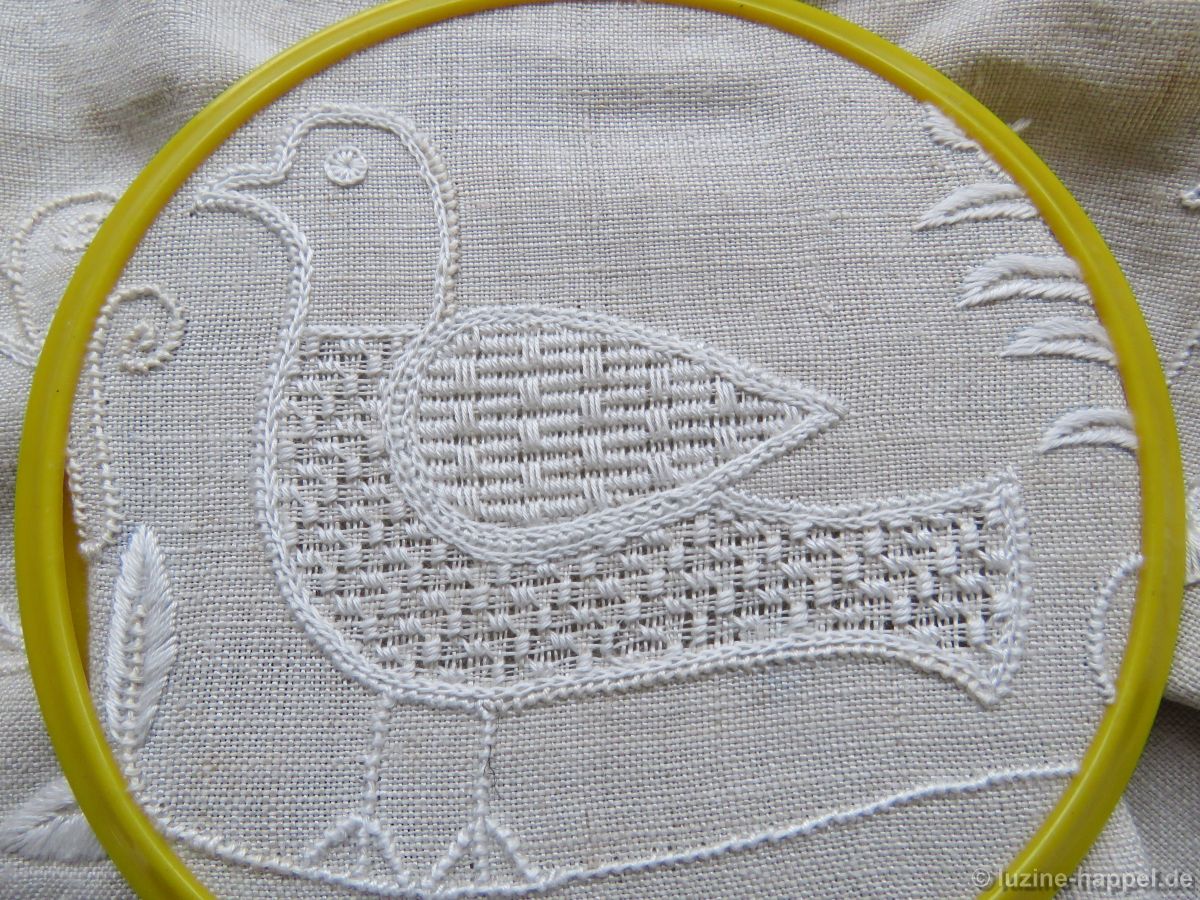
The belly of the bird looking to the right receives a special Limet thread withdrawing – namely 3:1 vertically and 2:1 horizontally.

This means that the stitches in the “Narrow Pearl Pattern” Satin stitch pattern do not become too wide (Wickelstiche, page 43)

The wing also has such a thread withdrawing, but this time 2:1 vertically and 3:1 horizontally)

and a modification of filling pattern 578 (without rows of Four-Sided stitches in between) (coton à broder No. 20).

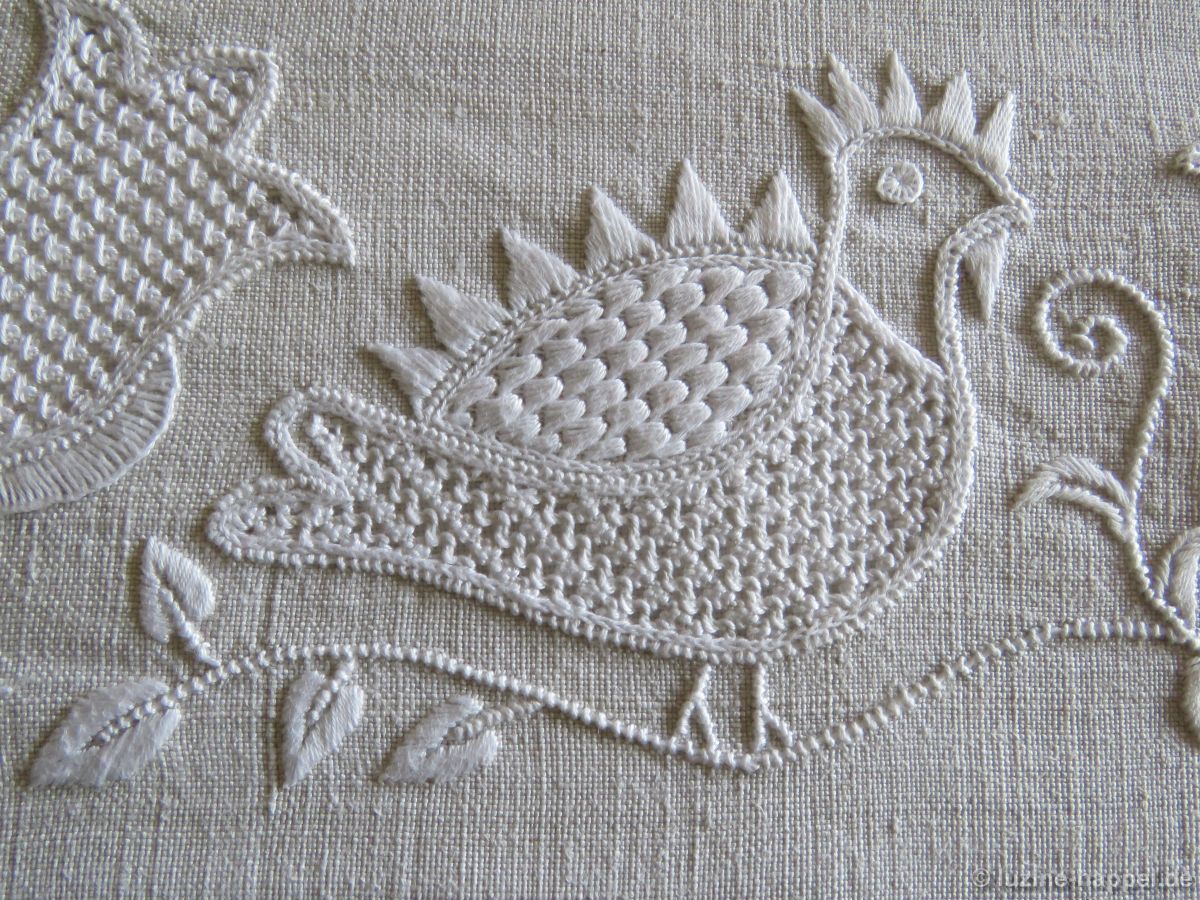
The belly of the bird looking to the left receives a Limet thread-withdrawing 3:1

and the Satin stitch pattern “Diagonal step over one plot” (Wickelstiche, page 22) (coton à broder No. 20).

The wing also receives a thread withdrawing of 3:1

and the Satin stitch pattern “Narrow Honeycomb Pattern” (Wickelstiche, page 87) (coton à broder No. 20).

The two tulips running diagonally

receive an openwork thread withdrawing 2:2. The thread grid is secured with Cable stitches (coton à broder No. 30).

The tulips on one side receive the needle-weaving stitch pattern “135” (Openwork Needleweaving Patterns, page 71) (coton à broder No. 20)

The tulips on the other side receive the needle-weaving stitch pattern “37” (Openwork Needleweaving Patterns, page 22) (coton à broder No. 20).

The belly of the next bird looking to the left receives an openwork thread withdrawing 2:2.

The thread grid is secured with Cable stitches (coton à broder No. 30).

A pattern of needle-weaving stitches with spiders (Openwork Pattern Samplers, pages 72, 73) is embroidered.

The wing of this bird also receives an openwork grid (2:2), into which the needle-weaving stitch pattern “1” (Openwork Needleweaving Patterns, page 4) (coton à broder No. 20) is worked.

The bird’s legs remain free. The cut edges of the withdrawn threads are covered with Chain stitches.

The belly of the bird looking to the right receives a thread withdrawing 2:1 and the pattern “Houndstooth” (Limerosen I, page 40) (coton à broder No. 25).

Here too, the raw edges are covered with Chain stitches.

The wing of this bird receives a horizontal thread withdrawing 2:3.

The filling pattern 562 is worked with coton à broder No. 20.

The small remaining tulips

receive a pattern of Wave stitches in the continuous area. The narrow areas of the divided tulips are filled with Satin, Blanket and Knot stitches.

The pattern of the “Horizontal Bird Border ” offers many possibilities in addition to being used as a continuous long band. You can take individual motifs or put together smaller or larger groups.

Horizontal Bird Border (2)

Here are a few details of the embroidery of the horizontal bird border, this time starting with the center motif – the big heart. Satin stitch bars (coton à broder No. 20) and parts of the warped suare eyelet (Limetrosen I, page 44; coton à broder No. 25) are embroidered into a Limet grid (thread withdrawing 3:1).

Actually the order of the patterns doesn’t matter. However, if you embroider the square eyelet parts first, you can embroider all sections of the Satin stitch bars in one row.

Even unwashed, this pattern has a special effect,

washed and ironed, the square eyelet parts stand out strikingly.

The side tulips also receive a Limet grid (thread withdarwing 3:1) and Diagonal Cross stitches (coton à broder No. 20) as a filling pattern.

Now bird and tulip motifs alternate, although the motifs can also be placed in a different order, as a shorter section of border or as an individual element. The same border with a different motif as the center can be seen in picture 13 of my blog readers’ embroidery from 2020.

The roosters have an openwork grid of threads in their belly area (thread withdawing 2:2)

and in the wing area a Lime grid (thread withdrawing 3:1). The belly of the left-sided rooster bird receives a row of Cable stitches alternating with a row of Rose stitches,

that of the right-hand side has one row of Cable stitches alternating with two rows of Rose stitches.

The wing of the right rooster is filled with a Satin stitch herringbone pattern (coton à broder No.20).

I originally wanted to embroider the wing of the left rooster with the square eyelet pattern “Plumage” (Limetrosen I, page 15),

but then I chose the more striking “Scales” pattern (Limetrosen I, Seite 68).

The following tulip has a Limet grid in the middle part (thread withdrawing 3:1)

and the filling pattern 579, once vertically with the tips upwards

and the other time embroidered with the tips pointing downwards.

The side parts are embroidered once with a simple withdrawn thread pattern (thread withdrawing 3:1 vertically) with Honeycomb Darning stitches (coton à broder No. 20),

the counterpart receives a 2:1 thread withdrawing and Cable stitches as pattern (coton à broder No. 20).

The next pair of birds receives a Limet grid in the belly area (thread withdrawing 3:1).

The bird looking to the right receives a checkerboard pattern made of Satin stitch bars and Röserich stitches similar to Röserich pattern 467 (The most beautiful Röserich Filling Patterns, page 23)

the bird looking to the right receives filling pattern 473.

Both wings receive a Limet grid (thread withdrawing 3:1).

To match the pattern of the bird’s belly, but adapted to the much smaller area, the Röserich pattern 453 A2 (The most beautiful Röserich Filling Patterns, page 8) is used.

The bird opposite also has a pattern on its wing that matches the bird’s belly –

namely a Rose stitch variant.

Details about the thread withdrawing and the selected filling patterns for the remaining motifs will follow in the next blog post.

Horizontal Bird Border

Like many other embroiderers, I have a box of unfinished embroidery. Once started, more interesting or important pieces came along. Therefore, completion was postponed to a later date. As you get older, you feel the need to finish the pieces you start.
This is what happened to me with a border design that I started embroidering 2017 – the “Horizontal Bird Border”.

Now the 19 large and a few small motifs are embroidered with a wide variety of filling patterns. I would like to share the results with my blog readers. However, the finished band, which is 2.44 m long, cannot be photographed in its entirety.
The section provides a first insight.

The detailed photos show the entire band continuously from left to right.

Details about the thread withdrawing and the chosen filling patterns will follow in the next blog post.

Embroidery for a Bag (1)

Large felt bags are popular at the moment. You can buy them in many colours and different sizes.
I find a bag like this very practical for transporting my utensils when I want to take part in the embroidery circle.

To my regret, the bags have a label that I don’t find very nice.

So I thought about how the bag could be redesigned according to use. I came up with the idea of ​​embroidery covering the lettering.

I choose hand-woven linen because I like the structure and colour of it well with my anthracite-coloured felt bag.

My bag is 45 cm wide and 30 cm high. The handles start at a height of 23 cm. The remaining space for embroidery is 45 cm x 23 cm, approximately half as high as it is wide. I don’t want to fill the entire space, but I want the embroidery to match the bag size and cover all of the printed characters.

Therefore, I choose a finished size of 38 cm x 19 cm and add a seam allowance of 1 cm on each side. So I cut the linen to size 40 cm x 21 cm. A pattern that fits this format can be printed quickly.

The embroidery can begin.
(Since I would like to use this project as photo material for a short presentation of Schwalm whitework, I don’t proceed as usual, but only work in partial areas. This way one can follow the necessary steps in a single photo.)

But that shouldn’t bother you and you should of course proceed as established.

The heart receives an openwork thread withdrawing 2:2. The grid is secured from the back with Cable stitches. Filling pattern 442 is worked using needle-weaving stitches.

The tulip receives a Limet thread withdrawing 3:1 and a Röserich filling pattern (The Most Beautiful Röserich Filling Patterns)

The small circle gets a Limet thread withdrawing of 4:1 in width and 3:1 in height in order to be able to set the pattern evenly despite the uneven fabric. A cross made of Satin stitch bars is placed in the center. The remaining areas are each decorated with a Rose stitch

The bird’s belly is given a simple 3:1 withdrawn thread pattern with Honeycomb Darning stitches.
The bird’s wing has a relatively small area. Therefore, thread withdrawing is made 2:1 and the grid is secured from the back with Cable stitches.

The large leaf gets a 3:1 Limet thread withdrawing and Diagonal Cross stitches as a pattern.

The year of embroidering should be hidden in the small tulip. Therefore the thread withdrawing is made 2:1. The thread grid is secured with very thin thread with Cable stitches from the front (Single Faggot stitches on the back). The first part of the year is embroidered with Rose stitches (the second part goes into the tulip on the opposite side).

The second small circle remains. Since I want to show all the techniques used in Schwalm whitework on this sample, I fill the area with needlelace.

ou will find out what happens after the embroidery is finished in the next blog post.

Schwalm Heart (1)

Many years ago, during an exhibition, I was able to purchase a few leftover pieces of linen along with the corresponding outline patterns for little money.
I have now acquired the rights to these patterns.
The pretty individual motifs are quickly embroidered. They are also ideal for processing leftover fabric.
Little things like pictures, bags or pillows were created in a short time. They are therefore suitable as souvenirs and perhaps also for sale as souvenirs for exhibitions.

I ironed such a motif onto 16 tpcm linen. In order to clearly transfer the iron pattern colour to the fabric, I ironed very hot. The slight scorching marks that were created can be clearly seen. They will disappear later in the wash.

The Coral Knot stitches were embroidered with coton á broder No. 16, Blanket stitch eyelets and Chain stitches withcoton á broder No. 30. The rounded leaves were decorated with Satin stitches. Here 2 strands of the 6-ply stranded cotton were used.

The Limet grid – thread withdrawing 3:1 – has a withdrawn theard line in the middle longitudinal axis.

Starting there, a pattern similar to the filling pattern 578, but without the rows of Four-Sided stitches in between, is embroidered with coton à broder No. 20 .

After the embroidery is finished, the piece is soaked in soapy water for a few hours and then boiled. The colour has completely dissolved after two repetitions of the short cooking process.

The scorching marks have also completely disappeared.

I like the relatively unobtrusive pattern in contrast to the striking edge with the many leaves

and Blanket stitch eyelets.

Depending on which angle you look at it from, the pattern looks different.

If you also want to embroider this small motif, you can download the hand-drawn outline pattern for free.